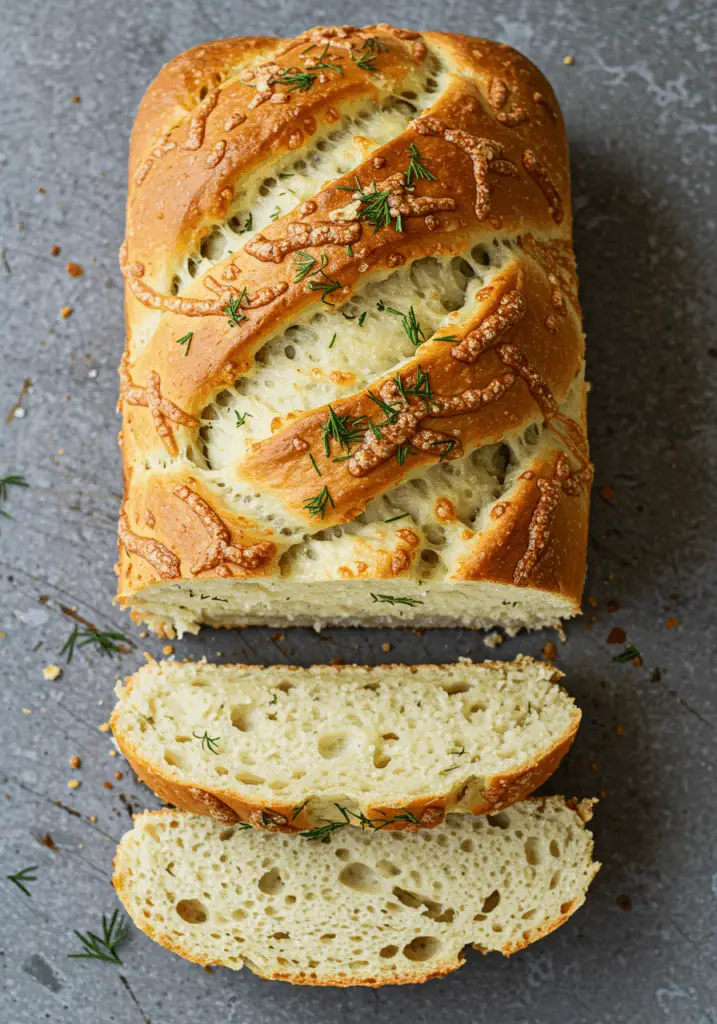
Crusty on the outside, soft and fragrant on the inside—this Rustic No Knead Rosemary Garlic Bread is the perfect homemade loaf for anyone who loves fresh herbs and bold flavor without the fuss. Infused with roasted garlic and fresh rosemary, this easy bread recipe requires no kneading, no mixer, and minimal hands-on time. Just mix, rest, and bake for bakery-quality results right from your own kitchen.


Want recipes like this delivered straight to your inbox? Subscribe now for easy artisan bread recipes, savory bakes, and homemade comfort food made simple.
Why You’ll Love This Recipe
No Kneading Required – Just stir, let it rise, and bake.
Big Flavor, Minimal Effort – Roasted garlic and rosemary infuse every bite.
Crispy Artisan Crust – Bakes beautifully in a Dutch oven for a golden, crackly crust.
Great for Beginners – Foolproof method that works every time.
Perfect with Everything – Serve with soups, salads, or as a stand-alone snack.
Ingredients You’ll Need (Makes 1 Loaf)
3 cups (375g) all-purpose flour
1½ tsp salt
½ tsp active dry yeast
1½ cups (360ml) warm water
1 tbsp fresh rosemary, finely chopped (plus extra for topping)
1 whole head of garlic
1 tbsp olive oil (for roasting garlic)
Cornmeal or flour, for dusting
Tools You’ll Need
Mixing bowl
Parchment paper
Dutch oven with lid (or heavy oven-safe pot)
Sharp knife
Aluminum foil
Oven preheated to 450°F (230°C)
Step-by-Step Instructions
Step 1: Roast the Garlic
Preheat oven to 400°F (200°C). Cut the top off a whole head of garlic to expose the cloves. Drizzle with olive oil, wrap in foil, and roast for 30–40 minutes until golden and soft. Let cool, then squeeze the cloves from the skins and mash into a paste.
Step 2: Make the Dough
In a large bowl, mix flour, salt, and yeast. Add warm water, mashed roasted garlic, and chopped rosemary. Stir with a spoon until a shaggy, sticky dough forms. Cover with plastic wrap or a towel and let rest at room temperature for 12–18 hours.
Step 3: Shape and Rest Again
After the first rise, the dough will be bubbly and soft. Turn it out onto a floured surface. With floured hands, fold the dough over itself a couple of times. Shape it loosely into a round and place it on a piece of parchment paper. Cover with a towel and let rest for 30–60 minutes.
Step 4: Preheat Your Dutch Oven
While the dough is resting, place a Dutch oven (with lid) in the oven and preheat to 450°F (230°C) for at least 30 minutes.
Step 5: Bake the Bread
Carefully remove the hot Dutch oven and lower the dough (on parchment paper) into it. Sprinkle with a little extra rosemary and a pinch of sea salt if desired. Cover and bake for 30 minutes. Remove the lid and bake for another 10–15 minutes until golden and crisp.
Step 6: Cool and Slice
Transfer bread to a wire rack and let cool for at least 30 minutes before slicing. Serve warm with butter, olive oil, or your favorite soup.
Tips for the Best No Knead Bread
Use Fresh Herbs – Rosemary adds the best aroma and flavor when freshly chopped.
Let It Rest Long Enough – The 12–18 hour rise gives it great texture and flavor.
Don’t Skip the Parchment – It makes lifting and transferring the dough easy and safe.
Add Cheese – Mix in ½ cup shredded Parmesan or Asiago for an extra savory twist.
Store It Right – Keep it wrapped in a towel or paper bag for a crusty texture.
Serving Suggestions
With Soup – Try it with tomato, butternut squash, or minestrone.
As a Sandwich Base – Perfect for grilled cheese or paninis.
With Olive Oil & Balsamic – A great appetizer with dips.
Toasted with Butter – Simple and satisfying breakfast or snack.
With Charcuterie – A rustic addition to cheese boards and tapas.
How to Store & Reheat
Storing: Room Temperature: Wrap in a clean towel or keep in a bread box for up to 3 days. Freeze: Wrap tightly and freeze whole or sliced for up to 2 months.
Reheating: Oven: Reheat slices at 300°F for 5–7 minutes. Toaster: Toast for a crispy edge and warm interior.
Frequently Asked Questions
Can I use instant yeast instead of active dry? Yes—use the same amount and mix directly into the flour.
Can I speed up the rising time? For a quicker version, let it rise for 3–4 hours at room temp, then follow the rest of the steps. The flavor won’t be as deep but still delicious.
Can I use dried rosemary? Yes, but use less—about 1 tsp dried rosemary for every 1 tbsp fresh.
Do I need a Dutch oven? It helps create a bakery-style crust, but you can also bake it on a tray with a metal pan of hot water placed in the oven to create steam.
Final Thoughts
This Rustic No Knead Rosemary Garlic Bread is a foolproof favorite that delivers artisan-quality flavor with hardly any effort. Whether you’re a first-time bread baker or just love fresh, homemade loaves, this recipe brings warmth, fragrance, and a touch of rustic charm to any meal. Try it once, and you’ll never go back to store-bought again.
Preparation Time: 10 minutes
Rise Time: 12–18 hours
Baking Time: 40–45 minutes
Cuisine: Rustic European
Nutritional Information (Per Slice, 12 slices):
Calories: 180 | Protein: 5g | Carbohydrates: 34g | Fat: 3g | Fiber: 1g | Sodium: 230mg


Rustic No Knead Rosemary Garlic Bread
- Total Time: 10 minutes
Description
Crusty on the outside, soft and fragrant on the inside—this Rustic No Knead Rosemary Garlic Bread is the perfect homemade loaf for anyone who loves fresh herbs and bold flavor without the fuss. Infused with roasted garlic and fresh rosemary, this easy bread recipe requires no kneading, no mixer, and minimal hands-on time. Just mix, rest, and bake for bakery-quality results right from your own kitchen.
Want recipes like this delivered straight to your inbox? Subscribe now for easy artisan bread recipes, savory bakes, and homemade comfort food made simple.
Ingredients
3 cups (375g) all-purpose flour
1½ tsp salt
½ tsp active dry yeast
1½ cups (360ml) warm water
1 tbsp fresh rosemary, finely chopped (plus extra for topping)
1 whole head of garlic
1 tbsp olive oil (for roasting garlic)
Cornmeal or flour, for dusting
Instructions
Step 1: Roast the Garlic
Preheat oven to 400°F (200°C). Cut the top off a whole head of garlic to expose the cloves. Drizzle with olive oil, wrap in foil, and roast for 30–40 minutes until golden and soft. Let cool, then squeeze the cloves from the skins and mash into a paste.
Step 2: Make the Dough
In a large bowl, mix flour, salt, and yeast. Add warm water, mashed roasted garlic, and chopped rosemary. Stir with a spoon until a shaggy, sticky dough forms. Cover with plastic wrap or a towel and let rest at room temperature for 12–18 hours.
Step 3: Shape and Rest Again
After the first rise, the dough will be bubbly and soft. Turn it out onto a floured surface. With floured hands, fold the dough over itself a couple of times. Shape it loosely into a round and place it on a piece of parchment paper. Cover with a towel and let rest for 30–60 minutes.
Step 4: Preheat Your Dutch Oven
While the dough is resting, place a Dutch oven (with lid) in the oven and preheat to 450°F (230°C) for at least 30 minutes.
Step 5: Bake the Bread
Carefully remove the hot Dutch oven and lower the dough (on parchment paper) into it. Sprinkle with a little extra rosemary and a pinch of sea salt if desired. Cover and bake for 30 minutes. Remove the lid and bake for another 10–15 minutes until golden and crisp.
Step 6: Cool and Slice
Transfer bread to a wire rack and let cool for at least 30 minutes before slicing. Serve warm with butter, olive oil, or your favorite soup.
Notes
Use Fresh Herbs – Rosemary adds the best aroma and flavor when freshly chopped.
Let It Rest Long Enough – The 12–18 hour rise gives it great texture and flavor.
Don’t Skip the Parchment – It makes lifting and transferring the dough easy and safe.
Add Cheese – Mix in ½ cup shredded Parmesan or Asiago for an extra savory twist.
Store It Right – Keep it wrapped in a towel or paper bag for a crusty texture.
- Prep Time: 10 minutes
- Cuisine: Rustic European