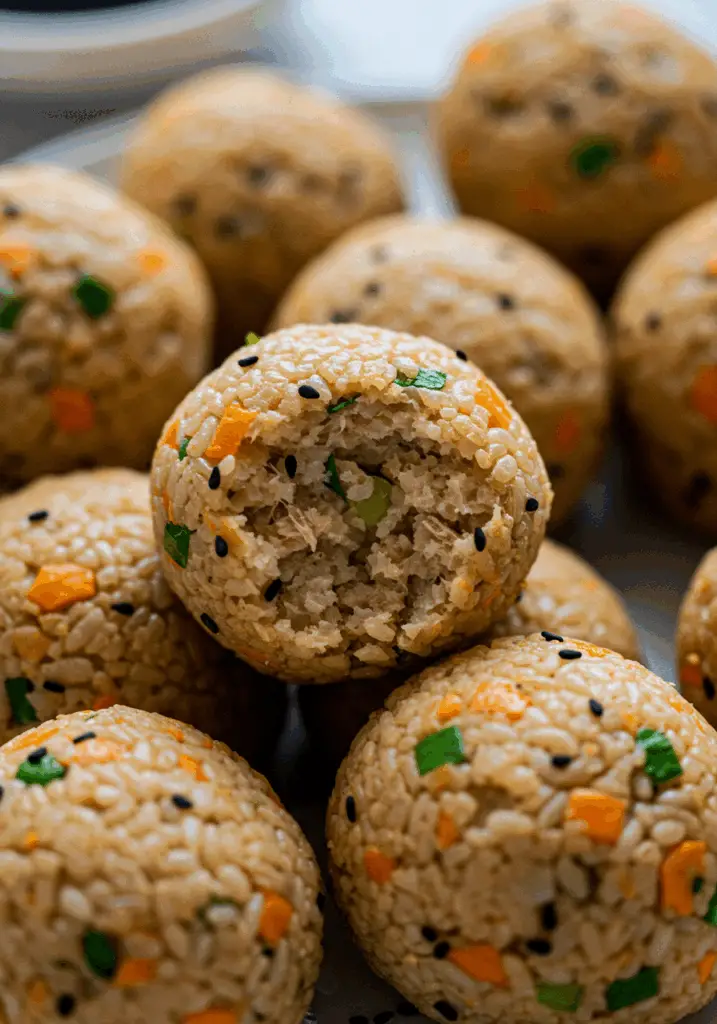
These Healthy Tuna Rice Balls are the perfect fusion of convenience, nutrition, and flavor. Packed with protein-rich tuna, fresh vegetables, and perfectly seasoned rice, they make an ideal grab-and-go snack, lunchbox filler, or light meal. Inspired by Japanese onigiri but adapted for everyday simplicity, these rice balls are satisfying without being heavy.


Want more smart, healthy recipes that don’t compromise on taste? Subscribe now and get weekly inspiration delivered straight to your inbox!
Why You’ll Love This Recipe
High in Protein – A wholesome way to stay full longer.
Quick & Easy – Ready in 30 minutes or less.
Kid-Friendly – Great for school lunches and picky eaters.
Customizable – Add your favorite veggies, spices, or sauces.
Portable – Perfect for snacks, picnics, or lunchboxes.
Ingredients You’ll Need
For the Tuna Filling:
- 1 can (5 oz) tuna in water, drained
- 1 tbsp plain Greek yogurt or light mayo
- 1 tsp Dijon mustard (optional for a tangy twist)
- ½ tsp soy sauce or tamari
- 1 green onion, finely chopped
- Salt & pepper to taste
- Optional: diced cucumber, grated carrot, or chopped pickles
For the Rice:
- 2 cups cooked short-grain or sushi rice (slightly warm)
- 1 tsp rice vinegar
- ½ tsp sesame oil
- ½ tsp salt
- 1 tsp toasted sesame seeds (optional)
For Assembly:
- Nori sheets, cut into strips or squares (optional)
- Extra sesame seeds or furikake for garnish
- Plastic wrap or clean hands for shaping
Tools You’ll Need
- Mixing bowls
- Spoon or fork
- Knife and cutting board
- Rice paddle or spoon
- Plastic wrap or gloves
- Small bowl of water for moistening hands
Step-by-Step Instructions
Step 1: Prepare the Tuna Filling
- In a bowl, mix drained tuna with yogurt (or mayo), soy sauce, mustard (if using), green onion, and any add-ins like cucumber or carrot.
- Season with salt and pepper to taste.
- Set aside in the fridge while you prep the rice.
Step 2: Season the Rice
4. In a large bowl, mix the warm rice with rice vinegar, sesame oil, salt, and sesame seeds.
5. Let it cool slightly until it’s comfortable to handle—lukewarm is best for shaping.
Step 3: Assemble the Rice Balls
6. Wet your hands or use plastic wrap to prevent sticking.
7. Take a small handful of rice (about ¼ cup) and flatten it into your palm.
8. Place 1–2 teaspoons of the tuna filling in the center.
9. Add a bit more rice on top and gently form into a ball or triangle, sealing the filling inside.
10. Repeat with the remaining rice and filling.
Step 4: Garnish or Wrap
11. Press a strip of nori onto each rice ball if using.
12. Sprinkle with extra sesame seeds or furikake for added flavor and crunch.
Step 5: Serve or Store
13. Serve immediately or wrap in plastic wrap and refrigerate for later.
14. Best enjoyed slightly chilled or at room temperature.
Tips for Perfect Tuna Rice Balls
Use Sticky Rice – Short-grain or sushi rice holds its shape best.
Cool Rice Slightly – Too hot and it’s hard to handle, too cold and it won’t mold well.
Keep Hands Damp – Prevents rice from sticking while shaping.
Don’t Overfill – Use just enough tuna to avoid breaking apart.
Wrap Well – Keeps them fresh and prevents drying out in the fridge.
Serving Suggestions
With Miso Soup – A complete, satisfying meal.
In Lunchboxes – Pack with veggie sticks and fruit for a balanced meal.
As a Snack – Quick and easy for post-workout or afternoon hunger.
With Soy Sauce Dip – A small side of low-sodium soy sauce adds flavor.
On a Picnic – Easy to pack, carry, and eat with your hands.
How to Store & Reheat
Store:
Wrap rice balls individually in plastic wrap and store in the refrigerator for up to 2 days.
Reheat (Optional):
Microwave for 10–15 seconds if you prefer them warm. Best enjoyed cold or room temp.
Freeze:
Not recommended—rice texture changes and may become dry or crumbly after thawing.
Frequently Asked Questions
1. Can I use brown rice instead?
Yes, though it won’t be quite as sticky. Add an extra dab of yogurt to help bind it.
2. What tuna is best for this recipe?
Canned light tuna in water is lean and works perfectly.
3. Can I make it spicy?
Absolutely! Add a dash of sriracha or a bit of chopped chili to the tuna mix.
4. Can kids eat these?
Yes! They’re mild, fun to eat, and easy for little hands.
Final Thoughts
These Healthy Tuna Rice Balls are the ultimate combination of flavor, nutrition, and convenience. Whether you’re meal prepping, packing a lunch, or just want something fun and satisfying to snack on, this recipe hits the spot every time.
Give them a try this week—you’ll be surprised how simple and delicious healthy eating can be!
Preparation Time: 15 minutes
Cooking Time: 10 minutes (if rice is not pre-cooked)
Cuisine: Japanese-Inspired – Healthy Fusion
Nutritional Information (Per Ball, ~8 servings):
Calories: 140 | Protein: 9g | Carbohydrates: 18g | Fat: 4g | Fiber: 1g | Sodium: 210mg


Healthy Tuna Rice Balls
- Total Time: 25 minutes
Description
These Healthy Tuna Rice Balls are the perfect fusion of convenience, nutrition, and flavor. Packed with protein-rich tuna, fresh vegetables, and perfectly seasoned rice, they make an ideal grab-and-go snack, lunchbox filler, or light meal. Inspired by Japanese onigiri but adapted for everyday simplicity, these rice balls are satisfying without being heavy.
Want more smart, healthy recipes that don’t compromise on taste? Subscribe now and get weekly inspiration delivered straight to your inbox!
Ingredients
For the Tuna Filling:
-
1 can (5 oz) tuna in water, drained
-
1 tbsp plain Greek yogurt or light mayo
-
1 tsp Dijon mustard (optional for a tangy twist)
-
½ tsp soy sauce or tamari
-
1 green onion, finely chopped
-
Salt & pepper to taste
-
Optional: diced cucumber, grated carrot, or chopped pickles
For the Rice:
-
2 cups cooked short-grain or sushi rice (slightly warm)
-
1 tsp rice vinegar
-
½ tsp sesame oil
-
½ tsp salt
-
1 tsp toasted sesame seeds (optional)
For Assembly:
-
Nori sheets, cut into strips or squares (optional)
-
Extra sesame seeds or furikake for garnish
-
Plastic wrap or clean hands for shaping
Instructions
Step 1: Prepare the Tuna Filling
-
In a bowl, mix drained tuna with yogurt (or mayo), soy sauce, mustard (if using), green onion, and any add-ins like cucumber or carrot.
-
Season with salt and pepper to taste.
-
Set aside in the fridge while you prep the rice.
Step 2: Season the Rice
4. In a large bowl, mix the warm rice with rice vinegar, sesame oil, salt, and sesame seeds.
5. Let it cool slightly until it’s comfortable to handle—lukewarm is best for shaping.
Step 3: Assemble the Rice Balls
6. Wet your hands or use plastic wrap to prevent sticking.
7. Take a small handful of rice (about ¼ cup) and flatten it into your palm.
8. Place 1–2 teaspoons of the tuna filling in the center.
9. Add a bit more rice on top and gently form into a ball or triangle, sealing the filling inside.
10. Repeat with the remaining rice and filling.
Step 4: Garnish or Wrap
11. Press a strip of nori onto each rice ball if using.
12. Sprinkle with extra sesame seeds or furikake for added flavor and crunch.
Step 5: Serve or Store
13. Serve immediately or wrap in plastic wrap and refrigerate for later.
14. Best enjoyed slightly chilled or at room temperature.
Notes
Use Sticky Rice – Short-grain or sushi rice holds its shape best.
Cool Rice Slightly – Too hot and it’s hard to handle, too cold and it won’t mold well.
Keep Hands Damp – Prevents rice from sticking while shaping.
Don’t Overfill – Use just enough tuna to avoid breaking apart.
Wrap Well – Keeps them fresh and prevents drying out in the fridge.
- Prep Time: 15 minutes
- Cook Time: 10 minutes (if rice is not pre-cooked)
- Cuisine: Japanese-Inspired – Healthy Fusion