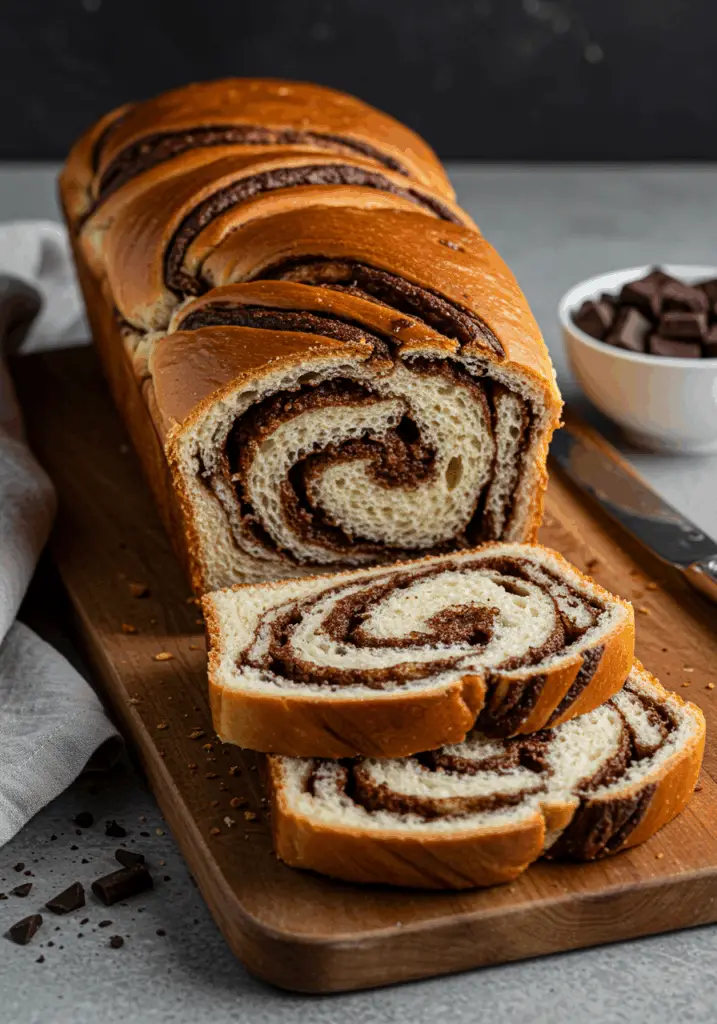
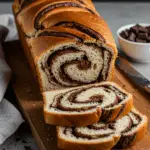
Soft, fluffy, and beautifully marbled, this Chocolate Swirl Milk Bread is a treat for the senses. It combines the pillowy texture of classic milk bread with a rich cocoa swirl that’s just sweet enough to satisfy your cravings. Whether you enjoy it as a breakfast slice or a cozy afternoon snack, this homemade bread is bound to become a family favorite.


Want recipes like this delivered straight to your inbox? Subscribe now to get the latest baking ideas and comforting creations you’ll love.
Why You’ll Love This Recipe
Delightfully Soft – Thanks to the milk-based dough, this bread stays ultra soft and tender.
Visually Stunning – The chocolate swirls look like artwork in every slice.
Perfectly Balanced – Not too sweet, making it ideal for breakfast, snacks, or light desserts.
Great for Beginners – A straightforward recipe that’s easy to follow with delicious results.
Freezer-Friendly – Bake ahead and enjoy later by freezing slices for quick future treats.
Ingredients You’ll Need
For the Milk Bread Dough:
- 2¾ cups bread flour
- ¼ cup granulated sugar
- 1 tsp salt
- 1 tbsp instant yeast
- 1 cup warm whole milk
- 1 egg, room temperature
- ¼ cup unsalted butter, softened
For the Chocolate Swirl:
- 2 tbsp unsweetened cocoa powder
- 2 tbsp hot water
- 1 tbsp sugar
- 1 tbsp butter, melted
For Brushing:
- 1 egg yolk
- 1 tbsp milk
Tools You’ll Need
- Large mixing bowl or stand mixer
- Rolling pin
- Loaf pan (9×5 inch)
- Whisk
- Silicone brush
- Plastic wrap or kitchen towel
Step-by-Step Instructions
Step 1: Make the Dough
- In a large mixing bowl, whisk together bread flour, sugar, salt, and instant yeast.
- In a separate bowl, combine warm milk and egg, then pour into the dry ingredients.
- Knead using your hands or a stand mixer on medium speed until the dough starts to come together.
- Add softened butter and continue kneading for 10–12 minutes until the dough becomes smooth and elastic.
- Shape the dough into a ball and place it in a greased bowl. Cover with plastic wrap or a damp towel and let it rise in a warm place for about 1 hour or until doubled in size.
Step 2: Prepare the Chocolate Paste
6. In a small bowl, mix cocoa powder and hot water until smooth.
7. Stir in sugar and melted butter to form a thick paste. Set aside to cool.
Step 3: Roll Out and Layer the Dough
8. Once the dough has risen, punch it down to release air.
9. Roll it out into a large rectangle, about ¼ inch thick.
10. Spread the chocolate paste evenly across the surface, leaving a small border.
11. Roll the dough tightly from the short end to form a log.
12. With a sharp knife, slice the log lengthwise down the middle to reveal the swirl.
13. Twist the two halves together, keeping the cut sides up, to form a braided shape.
14. Carefully place the braid into a greased loaf pan.
Step 4: Final Rise & Bake
15. Cover the loaf loosely with plastic wrap and let it rise again for 30–40 minutes.
16. Preheat your oven to 350°F (175°C).
17. Whisk egg yolk and milk together, then gently brush the top of the loaf.
18. Bake for 30–35 minutes, or until golden brown and cooked through.
19. If the top browns too quickly, loosely cover it with foil for the last 10 minutes.
Step 5: Cool and Serve
20. Let the bread cool in the pan for 10 minutes, then transfer to a wire rack.
21. Slice and serve once fully cooled. Enjoy as is or with a slather of butter or jam!
Tips for Perfect Chocolate Swirl Milk Bread
Use Bread Flour – It gives the bread that chewy, fluffy texture you love.
Be Patient with Kneading – A well-kneaded dough ensures the best structure and rise.
Even Chocolate Spread – Make sure the cocoa paste is spread evenly for consistent swirls.
Watch the Rise – Avoid overproofing in the second rise to keep the swirl tight.
Cool Before Slicing – Warm bread is tempting, but slicing too soon can ruin the texture.
Serving Suggestions
Toasted with Butter – A simple and satisfying breakfast.
French Toast – Take your weekend brunch to the next level.
Chocolate Bread Pudding – Use leftovers for an indulgent dessert.
With Coffee or Tea – The perfect pairing for a cozy afternoon break.
How to Store & Reheat
Storing:
Room Temperature: Wrap tightly in plastic wrap or store in an airtight container for up to 3 days.
Refrigerator: Store up to 1 week, though it’s best enjoyed fresh.
Freezer: Slice and freeze individually wrapped pieces for up to 2 months.
Reheating:
Toaster: Toast slices on medium until warmed and slightly crisp.
Oven: Warm at 300°F for 5–7 minutes.
Microwave: 15–20 seconds for a soft, quick heat-up.
Frequently Asked Questions
1. Can I use all-purpose flour instead of bread flour?
Yes, but the texture will be slightly softer and less chewy.
2. Is it okay to use plant-based milk?
Absolutely! Almond, oat, or soy milk all work well in this recipe.
3. Can I double the recipe?
Yes! You can make two loaves or one large braided loaf. Adjust the baking time accordingly.
4. How do I prevent the chocolate swirl from leaking?
Make sure the chocolate paste is thick and don’t spread too close to the edge of the dough.
Final Thoughts
This Chocolate Swirl Milk Bread combines the best of two worlds—fluffy, light milk bread and rich, chocolaty goodness. It’s the kind of loaf that disappears quickly, whether enjoyed warm from the oven or toasted the next day. Try it out and fall in love with the irresistible swirl!
Bake it for your next breakfast or brunch gathering, or simply to treat yourself during the week. You won’t be disappointed.
Preparation Time: 20 minutes
Cooking Time: 35 minutes
Resting Time: 1 hour 30 minutes
Cuisine: Japanese
Nutritional Information (Per Serving):
Calories: 280 | Protein: 7g | Carbohydrates: 40g | Fat: 10g | Fiber: 2g | Sodium: 180mg

Chocolate Swirl Milk Bread
- Total Time: 55 minutes
Description
Soft, fluffy, and beautifully marbled, this Chocolate Swirl Milk Bread is a treat for the senses. It combines the pillowy texture of classic milk bread with a rich cocoa swirl that’s just sweet enough to satisfy your cravings. Whether you enjoy it as a breakfast slice or a cozy afternoon snack, this homemade bread is bound to become a family favorite.
Want recipes like this delivered straight to your inbox? Subscribe now to get the latest baking ideas and comforting creations you’ll love.
Ingredients
For the Milk Bread Dough:
-
2¾ cups bread flour
-
¼ cup granulated sugar
-
1 tsp salt
-
1 tbsp instant yeast
-
1 cup warm whole milk
-
1 egg, room temperature
-
¼ cup unsalted butter, softened
For the Chocolate Swirl:
-
2 tbsp unsweetened cocoa powder
-
2 tbsp hot water
-
1 tbsp sugar
-
1 tbsp butter, melted
For Brushing:
-
1 egg yolk
-
1 tbsp milk
Instructions
Step 1: Make the Dough
-
In a large mixing bowl, whisk together bread flour, sugar, salt, and instant yeast.
-
In a separate bowl, combine warm milk and egg, then pour into the dry ingredients.
-
Knead using your hands or a stand mixer on medium speed until the dough starts to come together.
-
Add softened butter and continue kneading for 10–12 minutes until the dough becomes smooth and elastic.
-
Shape the dough into a ball and place it in a greased bowl. Cover with plastic wrap or a damp towel and let it rise in a warm place for about 1 hour or until doubled in size.
Step 2: Prepare the Chocolate Paste
6. In a small bowl, mix cocoa powder and hot water until smooth.
7. Stir in sugar and melted butter to form a thick paste. Set aside to cool.
Step 3: Roll Out and Layer the Dough
8. Once the dough has risen, punch it down to release air.
9. Roll it out into a large rectangle, about ¼ inch thick.
10. Spread the chocolate paste evenly across the surface, leaving a small border.
11. Roll the dough tightly from the short end to form a log.
12. With a sharp knife, slice the log lengthwise down the middle to reveal the swirl.
13. Twist the two halves together, keeping the cut sides up, to form a braided shape.
14. Carefully place the braid into a greased loaf pan.
Step 4: Final Rise & Bake
15. Cover the loaf loosely with plastic wrap and let it rise again for 30–40 minutes.
16. Preheat your oven to 350°F (175°C).
17. Whisk egg yolk and milk together, then gently brush the top of the loaf.
18. Bake for 30–35 minutes, or until golden brown and cooked through.
19. If the top browns too quickly, loosely cover it with foil for the last 10 minutes.
Step 5: Cool and Serve
20. Let the bread cool in the pan for 10 minutes, then transfer to a wire rack.
21. Slice and serve once fully cooled. Enjoy as is or with a slather of butter or jam!
Notes
Use Bread Flour – It gives the bread that chewy, fluffy texture you love.
Be Patient with Kneading – A well-kneaded dough ensures the best structure and rise.
Even Chocolate Spread – Make sure the cocoa paste is spread evenly for consistent swirls.
Watch the Rise – Avoid overproofing in the second rise to keep the swirl tight.
Cool Before Slicing – Warm bread is tempting, but slicing too soon can ruin the texture.
- Prep Time: 20 minutes
- Cook Time: 35 minutes
- Cuisine: Japanese